All Posts By

Chris Berkley

2017 Running & Charitable Giving

By Charitable Giving No Comments

At the beginning of 2017 I committed myself to increasing my charitable giving. 2017 was a landmark year and I’d be naive to think that I got here by myself. No matter how much hard work you put in, there’s always someone who helped you along the way, and I feel it’s my responsibility to pay it forward.

I’m also an avid runner and in 2017 I made it my goal to donate $1 for every mile I ran. That motivates me to get out and run on days when I don’t feel like it, because I’m not just doing it for myself. It’s no secret I’m a data nerd, so I use GPS and Strava to map out all my runs, and the mileage is recorded.

In 2017 I ran 580 miles, primarily in and around Philadelphia. This heat map shows where I ran the most, often with the Fishtown Beer Runners, my running club, which I’m proud to say also does a lot of fundraising and charity work.

Giving was split between several different organizations, all of which I support in their mission and morals. The breakdown is as follows:


Most are straightforward. The two top organizations are local to Philadelphia.

  • Ella’s Retreat is a 501(c)(3) non-profit organization that provides lodging for families with children receiving proton therapy treatment at the Children’s Hospital of Philadelphia (CHOP).
  • Covenant House Philadelphia offers housing and support services to young people in need, especially the homeless, runaway and trafficked.

While my 2017 running mileage was lower than 2016 (803 miles) I look forward to 2018 and making a run (pun intended) at the 1,000 mile/$1,000 mark.

How To Use IMPORTXML & Google Sheets to Scrape Sites

By SEO, Technical SEO 6 Comments

IMPORTXML is a very helpful function that can be used in Google Sheets to effectively crawl and scrape website data in small quantities (especially useful for grabbing titles and meta descriptions, etc.). It can be faster and more convenient that using Screaming Frog or other tools, especially if you only need to pull data for a handful of URLs. This post will show you how to use IMPORTXML with XPath to crawl website data including: metadata, Open Graph markup, Twitter Cards, canonicals and more.

Skip Ahead: Get the free template.

Setting Up The IMPORTXML Formula

This is the IMPORTXML formula:

=IMPORTXML(url,xpath_query)

You can see there are two parts and they’re both quite simple:

The first half of the formula just indicates what URL is going to be crawled. This can be an actual URL – but it’s much easier to reference a cell in the spreadsheet and paste the URL there.

The second half of the formula is going to use XPath to tell the formula what data is going to be scraped. XPath is essentially a language that is used to identify specific parts of a document (like a webpage). Subsequent paragraphs will provide different XPath formulas for different pieces of information you might want to scrape.

Crawling Metadata with IMPORTXML

The following XPath formulas will scrape some of the most commonly desired SEO data like metadata, canonical tags, and H headings. Note that you can scrape any level of H heading by replacing the “h1” with whichever heading you want to scrape (h2, h3, etc.)

Title Tags: //title/text()
Meta Descriptions: //meta[@name='description']/@content
Canonical Tags: //link[@rel='canonical']/@href
H1 Heading(s): //h1/text()
H2 Heading(s): //h2/text()

Social Markup

While social markup has no immediate SEO benefit, it is very important for sites that have active audiences on social media, and implementation of social markup often falls under the umbrella of SEO because of its technical nature. The following XPath formulas will allow you to scrape Open Graph and Twitter Card markup.

Open Graph Markup

Open Graph is used by Facebook, LinkedIn and Pinterest, so all the more reason to make sure it’s implemented correctly.

OG Title: //meta[@property='og:title']/@content
OG Description: //meta[@property='og:description']/@content
OG Type: //meta[@property='og:type']/@content
OG URL: //meta[@property='og:url']/@content
OG Image: //meta[@property='og:image']/@content
OG Site Name: //meta[@property='og:site_name']/@content
OG Locale: //meta[@property='og:locale']/@content

Twitter Card Data

Twitter Card markup is only for….Twitter. Still important though!

Twitter Title: //meta[@name='twitter:title']/@content
Twitter Description: //meta[@name='twitter:description']/@content
Twitter Image: //meta[@name='twitter:image']/@content
Twitter Card Type: //meta[@name='twitter:card']/@content
Twitter Site: //meta[@name='twitter:site']/@content
Twitter Creator: //meta[@name='twitter:creator']/@content

Limitations

Unfortunately, IMPORTXML & Sheets cannot be used to scrape large quantities of data at scale, or it will stop functioning. For more than a handful of URLs, it’s recommended to use a more robust program like Screaming Frog (Screaming Frog does not have a URL limit when using it in list mode).

IMPORTXML Google Sheets Template

You can see how this works firsthand by making a copy of this Sheets Scraper Template and entering the URL of your choice in cell B6. To add additional URLs, copy & paste row 6, then enter a different URL.

Questions? Contact me here or reach out on Twitter!

WWW vs. non-WWW For SEO

By SEO, Technical SEO No Comments

There is no SEO benefit to WWW URLs vs non-WWW URLs. Best practice is to pick one as the preferred version and use server-side redirects to ensure all visitors (human and search engine) end up on one single preferred version of the URL.

What Is WWW?

First let’s start with URL structure:

In the URL above, there are three parts:

  • Protocol
  • Subdomain
  • Domain name

Protocol is a topic for another time, but WWW is technically a subdomain. Websites often use multiple subdomains for different purposes: one for email, one for intranet access, etc. The www subdomain has traditionally been used as the designated subdomain for public-facing websites.

Which Is Better For SEO?

As noted, there is no benefit for SEO purposes. You don’t actually need a subdomain. It’s perfectly fine not to use it and there is zero functional difference for SEO purposes. However, you DO need to pick one version and use it consistently.

Server-Side Redirects

Once a preferred version has been chosen, the other version needs to be 301-redirected at the server level. If it isn’t, it might result in:

  1. Non-preferred URLs returning 404 errors.
  2. The website rendering pages in both variations.

Configuring the server to redirect non-preferred versions to preferred versions ensures that ALL URLs will be redirected automatically.

Configuring Google Search Console

Additionally, it’s recommended to configure Search Console to indicate the preferred version as well. In the top right corner, click the gear icon and select Site Settings. There you’ll see the option to set a preferred version of the URL:

What Are XML Sitemaps? How To Use Them for SEO

By SEO, Technical SEO

XML Sitemaps are critical to help search engines crawl websites, but I frequently see clients with critical errors in their XML sitemaps. That’s a problem because search engines may ignore sitemaps if they repeatedly encounter URL errors when crawling them.

What Is An XML Sitemap?

An XML Sitemap is an XML file that contains a structured list of URLs that helps search engines crawl websites. It’s designed explicitly for search engines – not humans – and acts as a supplement. Whereas web crawlers like Googlebot will crawl sites and follow links to find pages, the XML sitemap can act as a safety net to help Googlebot find pages that aren’t easily accessed by crawling a site (typically called island pages, if there are no links built to them).

Where Do XML Sitemaps Live?

The XML sitemap lives in the root folder, immediately after the domain, and often follows a naming convention such as domain.com/sitemap.xml. A Sitemap declaration should also be placed in the robots.txt file so that Google can easily discover it when it crawls the robots.txt file.

What URLs Should Be Included In An XML Sitemap?

URLs included in the XML sitemap should be URLs that are intended to be crawled, indexed and ranked in search results. URLs should meet the following specific criteria in order to be included:

  • Only 200 OK URLs: no 404s, 301s, etc.
  • Pages do not contain a noindex tag
  • Pages are not canonicalized elsewhere
  • Pages are not blocked by robots.txt

HTTP Status Codes

Sitemap URLs should return clean 200 status codes. That means no 301 or 302 redirects, 404 errors, 410 errors or otherwise. Google won’t index pages that return 404 errors, and if Googlebot does encounter a 301 redirect, it will typically follow it and find the destination URL, then index that.

If you have 404 errors, first ask why: was a page’s URL changed? If so, consider redirecting that URL by locating the new URL. Take that new URL and make sure that is included in the sitemap.

If there are 301s or 302s, follow them to the destination URL (which should be a 200) and replace the redirected URL in the sitemap.

Noindexed & Disallowed Pages

If a page has a noindex tag, then it’s clearly not intended to be indexed, so it’s a moot point to include it in the XML sitemap. Similarly, if a page is blocked from being crawled with robots.txt, those URLs should not be included either.

If you DO have noindexed or disallowed pages in your XML sitemap, re-evaluate whether they should be blocked. It may be that you have a rogue robots.txt rule or noindex tags that should be removed.]

Non-Canonical URLs

If a page in the sitemap has a canonical tag that points to another page, then remove that URL and replace it with the canonicalized one.

Does Every Clean 200 Status URL Need To Be Included?

In short, no. Especially on very large sites, it may make sense to prioritize the most important pages and include those in the XML Sitemap. Lower priority, less important pages may be omitted. Just because a page is not included in the XML sitemap does not mean it won’t get crawled and indexed.

Sitemap Limits & Index Files

An XML sitemap can only contain 50,000 URLs or reach a file size of 10MB. Sitemaps that exceed this limit may get partially crawled or ignored completely. If a site has more than 50,000 URLs, you’ll need to create multiple sitemaps.

These additional sitemaps may be located using a sitemap index file. It’s basically a sitemap that has other sitemaps linked inside it. Instead of including multiple sitemaps in the robots.txt file, only the index file needs to be included.

If there ARE too many URLs to fit into one sitemap, URLs should be carefully and methodically structured in hierarchical sitemaps. In other words, group site sections or subfolders in the same sitemap so that Google can get a better understanding of how URLs interrelate. Is this required? No, but it makes sense to be strategic.

Types of XML Sitemaps

In addition to creating sitemaps for pages, sitemaps can (and should) be created for other media types including images, videos, etc.

Dynamic vs. Static

Depending on the CMS and how it’s configured, the sitemap may be dynamic, meaning it will automatically update to include new URLs. If it’s configured correctly, it will exclude all the aforementioned URLs that shouldn’t be included. Unfortunately, dynamic sitemaps do not always operate that way.

The alternative is a static sitemap, which can easily be created using the Screaming Frog SEO spider. Static sitemaps offer greater control over what URLs are included, but do not automatically update to include new URLs. In some cases I’ve recommended clients utilize static sitemaps if a dynamic sitemap cannot be configured to meet sitemap criteria. When that happens, I set a reminder to provide an updated sitemap, typically on a quarterly basis, or more often if new pages are frequently added to the site.

Submission to Webmaster Tools

Once an XML sitemap has been created and uploaded, it should always be submitted to Google Search Console and Bing Webmaster Tools to ensure crawlers can access it (in addition to the robots.txt declaration).

In Google Search Console

Navigate to Crawl > Sitemaps and at the top right you’ll see an option to Add/Test Sitemap. Click that and you can submit your sitemap’s URL to be crawled.

In Bing Webmaster Tools

From the main dashboard, navigate down to the sitemaps section and click “Submit a Sitemap” at the bottom right. There you can enter your sitemap’s URL.

Troubleshooting Contact Form Tracking With GTM

By Analytics

This post is to help folks that are having issues setting up Contact Form 7 tracking with Google Tag Manager after following my walk-through. Before you begin, consider the following, which can all affect your ability to track form submissions:

  • Google Analytics filters for IP addresses can exclude traffic and conversions from your home/office before it even gets into Google Analytics.
  • Google Analytics opt-out plugins for Chrome, Firefox, etc. have the same effect as IP filters.
  • If a single person fills the same form three times during their session, that will be recorded as three Events. However, it will only be recorded as one Goal Conversion. This is just how Google Analytics works.
  • If you have your site setup to redirect to a thank you page after the form is submitted, this tutorial will not work for you – you need to set up Goal Conversions differently.
  • If you are not using GTM to track submissions, this tutorial will not work for you. Similarly, if you have a mix of GA and GTM, I can’t guarantee how functional this will be for you.

Troubleshooting GTM Setup

Assuming you’ve double checked your setup and followed the directions carefully, with no typos, let’s start with Google Tag Manager and find out if the tags are firing. Log into GTM, navigate to the top right corner and click Preview.

You should then see this box:

We’re going to use GTM’s Debug mode to see if the event is firing, and make sure information is being sent to the Data Layer. Go to a page on your site with the Contact Form that you’ve setup tracking for, then do a hard refresh (Shift + F5 in Chrome) to ignore cached content and get a fresh page load.

You should see the Debug window at the bottom of the screen. The left pane shows events that have transpired during your time on the page. You will see two tags fired: Universal Analytics (basic page view tracking) and also the wpcf7mailsent tag with the custom Javascript that fires when mail is actually sent.

If you don’t see either of these, there’s an issue with one of those tags, and you should go back and make sure they’re set to fire correctly.

Next, fill out and submit the form. At left you should see a new event, wpcf7successfulsubmit. Clicking on it will reveal details about what tags were fired on this event. You should see the Contact Form Submission tag listed (see below).

Now go to the rightmost option in the row at the top of the pane – click on Data Layer. You should see CF7formID listed in the Data Layer, and it should have an actual form ID in it (in this case, 1192). This information was pushed into the Data Layer using the wpcf7mailsent tag. If you don’t see it, or it says undefined, go back and look at your wpcf7mailsent tag – it’s possible your tag has an issue.

Next, clicking on the Variables tab will show you what Variables were captured, and you should see a Data Layer Variable named CF7-formID. If you see the form ID listed in the Data Layer tab, but not the Variables tab, then it’s likely your custom CF7-formID Variable has an issue and you should take a second look.

If you run through all this troubleshooting and everything checks out, then we need to move into Google Analytics to keep evaluating the different parts of the process. It doesn’t mean your GTM setup is 100% working, but does start to narrow down the number of areas in which things went wrong.

Google Analytics Troubleshooting

Log into GA and go to the Real-Time > Events report. Fill out and submit your form again, then wait a few seconds. The GA event should be logged with the Category & Action you included in the Contact Form Submission GTM tag (see below).

If it isn’t, then first look at your Contact Form 7 Trigger and make sure it’s set to fire on wpcf7successfulsubmit. 

By clicking on the Event Category, GA will also show you the Event Label, which we set up to be the form ID. If you don’t see this, make sure your Contact Form Submission GTM tag has the Event Label defined correctly as the CF7-formID GTM Variable. Missing an Event Label will affect Goal conversion tracking if you have it set up to track a specific form.

If that all checks out, go look at the Real Time > Goal Conversion report. You should see your Goal Conversion appear there also. If it doesn’t, examine your Goal Conversion setup in Google Analytics to make sure you’re tracking the correct Event Category, Action and Label.

Assuming you have your Goal Conversion setup correctly, there are still a few possibilities which I’m reiterating from the beginning of this page:

  • Google Analytics filters for IP addresses can exclude traffic and conversions from your home/office before it even gets into Google Analytics.
  • Google Analytics opt-out plugins for Chrome, Firefox, etc. have the same effect as IP filters.
  • If a single person fills the same form three times during their session, that will be recorded as three Events. However, it will only be recorded as one Goal Conversion. This is just how Google Analytics works.
  • If you have your site setup to redirect to a thank you page after the form is submitted, this tutorial will not work for you – you need to set up Goal Conversions differently.
  • If you are not using GTM to track submissions, this tutorial will not work for you. Similarly, if you have a mix of GA and GTM, I can’t guarantee how functional this will be for you.

Speaking At WordCamp Cincinnati on November 12th

By Conferences

I’m excited to announce that I’ll be speaking at WordCamp Cincinnati on November 12th! WordCamp Cincinnati is a two-day conference for WordPress experts and enthusiasts to come together and listen to presenters talk about innovative ways to use WordPress.

My session will focus on Integrating WordPress & YouTube for Better SEO. Working with dozens of clients on WordPress & YouTube (including myself) I’ve gained a lot of experience into optimizing & integrating the two together in order to maximize organic visibility and market share in search results. My presentation will give attendees actionable steps that they can put into practice in order to take their WordPress & YouTube content to the next level.

Download My Slides

Video Integration Resources


Webinar: Using Google Analytics to Build Content Strategy

By Analytics


In October, I’m excited to announce I’ll be co-hosting a webinar about Using Google Analytics to Build Content Strategy. In my role as Sr. Account Manager at Seer Interactive, and as an independent consultant, I use Google Analytics daily to gain insights about the performance of existing content, then take those learnings and apply them to future content to drive similar results.

The good folks at WP Engine invited me to host this webinar based on my knowledge of Google Analytics, and also my experience working with WordPress, on client sites and also on my own. WP Engine offers managed WordPress hosting and we’ll be discussing their newly released Content Performance tool, which is a built-in reporting dashboard with WordPress-specific functionality.

Webinar Details

Length: It’s a 30 minute webinar designed to be as actionable as possible.

Date/Time: October 4th, 2017 at 12pm EDT

Topics:

  • Definition of common Google Analytics metrics
  • What the metrics mean, why they matter and how to use them
  • How to effectively use categories and tags for WordPress posts
  • How to integrate Google Analytics reporting into existing workflows
  • How to apply the data to improve your content strategy?
  • How to operationalize Google Analytics data for WordPress

You can sign up for free on the WP Engine site!

Finding Pages With Embedded Wistia Videos

By Technical SEO, Video No Comments

Wistia is a great platform for hosting videos on your site with tons of functionality including the ability to embed videos on pages and optimize them using built-in calls-to-action and pop-ups.

Recently I encountered a scenario where I wanted to find every website page that had a Wistia video on it. Going into Wistia’s back end revealed that the client had ~200 videos, but I had no idea where they were actually placed on the site, and wanted to ensure they were being used to full capacity.

With YouTube, you can simply run a Screaming Frog crawl and do a custom extraction to pull out all the embed URLs. From there you can determine which video is embedded based on that URL. However, the way Wistia embeds videos is not conducive to identifying which video is where, based on an embed URL. I couldn’t find any distinguishing characteristics that would help me identify which video was which.

How can such an advanced video platform be so incredibly difficult?

That’s mostly because Wistia relies heavily on Javascript. As Mike King notes in his article The Technical SEO Renaissance, right clicking a page and selecting “view page source” won’t work because you’re not looking at a computed Document Object Model. In layman’s terms, you’re looking at the page before it’s processed by the browser and content rendered via Javascript won’t show up.

Using Inspect Element is the only way to really see what Wistia content is on the page. Doing that will show you much more information, including the fact that Wistia automatically adds and embeds video Schema when you embed a video. This is awesome and saves a ton of work over manually adding Schema like you have to do with YouTube videos.

The video Schema contains critical fields like the video’s name and description. These are unique identifying factors that we can use to determine which video is placed where, but how can it be done at scale when we don’t even know which pages have videos and which don’t?

Finding Wistia Schema With Screaming Frog

Screaming Frog is one answer. Screaming Frog doesn’t crawl Javascript by default, but as of July 2016, DOES have the capability to do so if you configure it (you’ll need the paid version of the tool).

Go into Configuration > Spider > Rendering and select Javascript instead of Old AJAX Crawling Scheme. You can also uncheck the box that says Enable Rendered Page Screenshots, as this will create a TON of image files and take unnecessarily long to complete.

Setting Up a Custom Extraction

Next you will need to setup a Custom Extraction which can be done by going to Configuration > Custom > Extraction. I’ve named mine Wistia Schema (not required) and set the extraction type to regex, then added the following regular expression:

<script type="application\/ld\+json">\{"@context":"http:\/\/schema.org\/","\@id":"https:\/\/fast.wistia.net\/embed.*"\}<\/script>

This will ensure you grab the entire block of Schema, which can be manipulated in Excel later to separate different fields into individual columns, etc.

Then set Screaming Frog to list mode (Mode > List) and test the crawl with a page that you know has a Wistia video on it. By going into the Custom Extraction report, you should see your Schema appear in the Extraction column. If not, go back and make sure you’ve configured Screaming Frog correctly.

Screaming Frog Memory and Crawl Limits

The only flaw in this plan is that Screaming Frog needs a TON of memory to crawl pages with Javascript. Close any additional programs that you don’t need open so that you can reduce the overall memory your computer uses and dedicate more of it to Screaming Frog. With large sites, you may run out of memory and Screaming Frog may crash.

Takeaways

  • Wistia uses Javascript liberally.
  • Schema is embedded automatically, using Javascript.
  • Schema can be crawled and extracted with Screaming Frog, but it’s a memory hog so larger sites might be a no-go.

Questions? Tweet at me: @BerkleyBikes or comment here!

Google My Business Posts

By Local SEO, SEO 2 Comments

A few weeks ago Google rolled out a post feature for its My Business Listings. Now you can create Facebook-like posts in the back end of the Google My business interface, that will display an image, description and website link in a box below your Google My Business listing’s knowledge graph. First I’ll show you how to create & optimize these, then I’ll discuss where I foresee them being most useful.

Creating Google My Business Posts

First log into your Google My Business platform and select the location you want to create a post for (if you have more than one). So far posts have to be manually created for each location, so it’s not easy to roll them out to hundreds of listings. The post you create will only show up for the listing you create it for.

Once you’ve selected your location, click on the “Posts” option on the left nav and you’ll see a box in which you can write a post. You’ll also see previous posts located underneath (this particular post is expired, I’m not sure how long they stay there for).

Once you click into the post editor, it’ll look like this. The interface is admittedly clunky.

If you click on that big gray box, it’ll let you upload a photo and prompt you to crop it into a rectangular shape. (You would think the Photo Guidelines linked at the bottom would provide criteria for sizing, aspect ratio, etc. It does not.) Ideally your image should be engaging and grab attention. You may opt to include text in the image – this reminds me a lot of a Google AdWords Display ad, which may hint at the future of this functionality.

Then you can add a description – you have between 100-300 words.

There are really two types of posts – events and non-events. Non-event posts last a week, while event posts will prompt you to enter start/end dates and will stay up for the entire duration of the event.

You can also add one of several preset call-to-action buttons for people to click on (I’ve chosen ‘Learn More’) and add a URL. I highly recommend tagging this URL, just like you should tag the landing page URLs in your GMB listings. Otherwise, it’ll come through as organic, but you may not know whether it was from a normal SERP or the post itself.

You can use Google’s URL builder – be sure to tag the medium as organic (these URLs should only be accessible from an organic search). The source is up to you, but I’ve been using g-local-post as my source (to differentiate from g-local as my source in the listing URLs themselves).

Then you can preview your post and if it looks good, publish it.

Now you’ll see your post as a small box at the bottom of your branded knowledge graph. Despite the fact that I’ve done everything Google requested, the image is cut off and the description cut short. Hopefully this product evolves a bit and remedies some of those issues.

You might think “I wonder if they look better on mobile?” – the answer is no (see below). If there’s more than one post, you do see a carousel (whereas desktop only displays one post at a time). On mobile, Google does allow you to click on a tab and see the posts by themselves, but who’s realistically going to do that?

Takeaways

The GMB Post format and interface is clunky. The images almost never show up as intended, making them ineffective. Their usefulness is also limited by where they appear. The only time these posts will show up is in a knowledge graph, which typically indicates a branded search took place.

The chance they’d show up for a non-branded search is very limited, so they’re not much use to drive new organic traffic. If anything, they may steal traffic away from the GMB listings themselves, so be aware of that.

While my examples used blog posts, this is probably poor usage. These types of posts would be much better suited to location-specific events that someone searching for a particular location would want to know about.

It’s sort of like free display ads – I wouldn’t be surprised if Google eventually monetizes this with advertising, the way they added and monetized the local map pack with ads.

Questions? Comments? Tweet at me (@BerkleyBikes) or drop a comment here!

Bounce Rates: Are They Bad?

By Analytics, SEO One Comment

Let’s talk about bounce rates. The reason we’re talking about them is because they’re largely misunderstood and less scrupulous (less informed?) marketers than myself routinely make claims about lowering bounce rate…as if that’s universally a positive thing. It may be. Or it might not matter. Read on and I’ll explain why.

What Is Bounce Rate?

Before we really get into it, let’s recap what bounce rate is. Bounce rate is the percentage of visitors who have one single Google Analytics hit during their site session, before leaving. Very often, it is incorrectly stated that bounce rate is the percentage of people who view one page before leaving, but that’s not necessarily true. A pageview is a type of hit, but not all hits are pageviews (I’ll explain why in a few paragraphs).

Bounce rate is one of the metrics in the Google Analytics default report (the first screen you see when you login). I absolutely revile this report. I know its intentions are good, but I’ve seen far too many reports recapping these numbers and nothing else (to be fair, there was a time when a less-worldly version of myself created said reports).

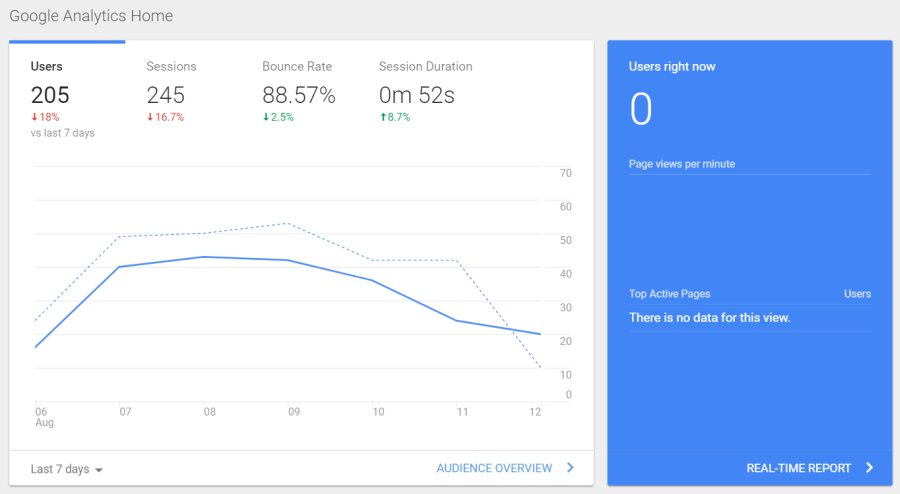
The default report is especially worthless because it looks at bounce rate across the entire site and that’s an utterly stupid way to use that metric. Different types of pages or marketing channels will have vastly different bounce rates and you shouldn’t roll them into one site-wide number.

The red/green colored text leads you to believe that a lower bounce rate is good and a higher bounce rate is bad, but consider this: What if someone lands on a location page where they get directions or a phone number? In that scenario, they might be considered a bounce, but in reality, they completed an action that takes them one step closer to being a customer.

Or, what if the page is lead-gen oriented, contains a form and gives visitors all the information they came for, without the need to click on another page? That may also be considered a bounce, but if the visitor converts into a lead, who cares?

What if the page has a baking recipe on it, and visitors spend 20+ minutes with the page open while they use that recipe, then close the browser when they’re done? Possibly still a bounce.

I could go on, but I won’t because I’ve made my point – there are plenty of scenarios where bounces are not something to be concerned about.

When Is Bounce Rate Bad?

If your site makes money from ad revenue, bounce rate could certainly be an issue. Most ad-based sites rely on multiple pageviews per session so they can cycle more ads and increase the likelihood one one of them is relevant and gets clicked. Ever wonder why “22 Photos of Cats in Boxes” takes 24 pages to finish reading? Ad revenue, that’s why.

Similarly, if you have a high bounce rate on gateway pages that are supposed to funnel traffic to other pages on the site, that could be an issue. Even then, it’s highly dependent on the site/design/business model/industry.

In other words, yes, a high bounce can be a problem, but should be evaluated on a case-by-case basis and with plenty of scrutiny. Looking at a site-wide bounce rate is a complete waste of time, and an exercise in futility.

Interaction vs. Non-Interaction Hits

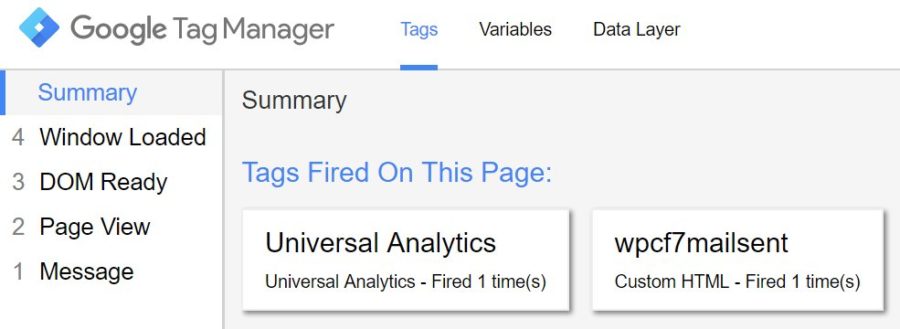
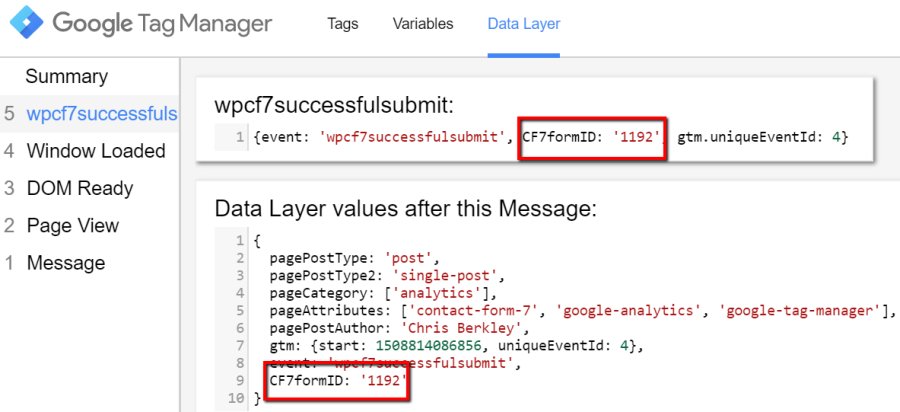
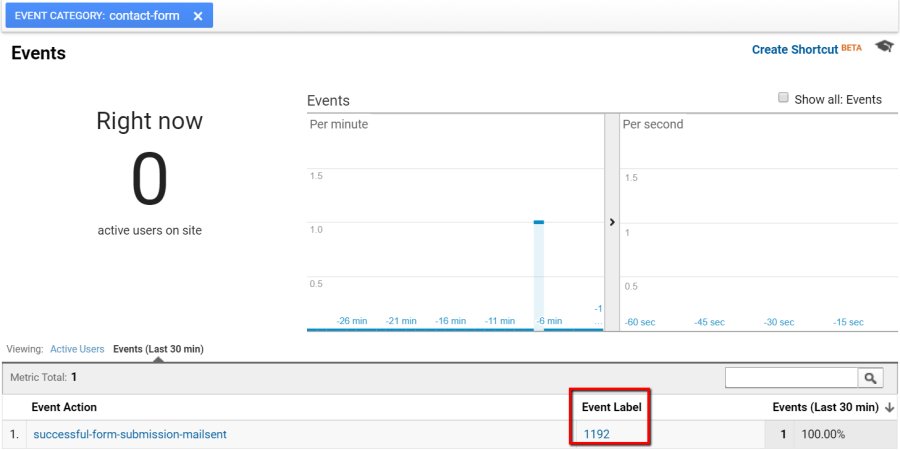
Earlier I said bounce rate is based on the number of hits and not pageviews. As noted, pageviews are a type of hit, but there are also many others including form submissions, click to call, click to get directions, video plays, etc – These actions can be set up as interaction hits or non-interaction hits.

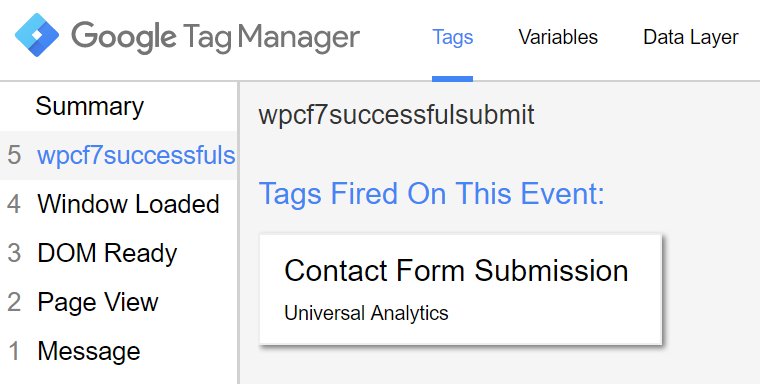
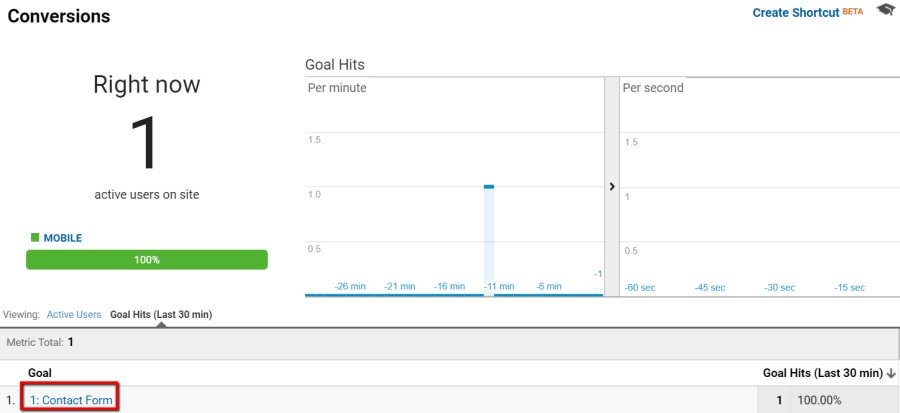
An interaction hit will affect the bounce rate. A person who views one page and fills out a contact form will count as two hits – not a bounce.

A non-interaction hit does not affect the bounce rate. You might want to track video views, but if they’re less of a priority than form fills, you can track them as non-interaction hits. A person who views one page and watches a video that’s configured as a non-interaction hit, will still count as a bounce.

The choice between interaction and non-interaction hits gives you the flexibility to adjust the way bounce rate is calculated, for better data. But that’s not the end of it by any means.

Multi-Touch, Multi-Channel Conversion Funnels

So a single pageview is OK as long as there’s also an interaction hit, but still bad if there isn’t, right? Well…no. That bounce visit could still serve an important role in the customer’s path to conversion. It’s common for marketers to analyze and report on data using Google Analytics’ Last Non-Direct Click attribution model (guilty as charged) and when that happens, it’s easy to over-emphasize bounce rate.

Let me back up again. Google Analytics lets you apply several different attribution models in order to give attribution (credit) to different channels based on their position in the conversion path. You can read more about it here, but the default attribution model is last non-direct click, where the last channel before the conversion receives attribution, unless that channel is direct.

We know a prospective customer may visit a website multiple times before converting. We also know that customer may arrive at the site via a number of different digital channels. The diagram below shows a three touch conversion path (AdWords > SEO > Direct). While the initial touch was an Adwords ad click, organic will get attributed the conversion because it’s the last non-direct touchpoint.

But without careful analysis (and in part due to the last non-direct click attribution model), these three sessions are likely to be viewed from a siloed perspective, without making the connection they all played an important role.

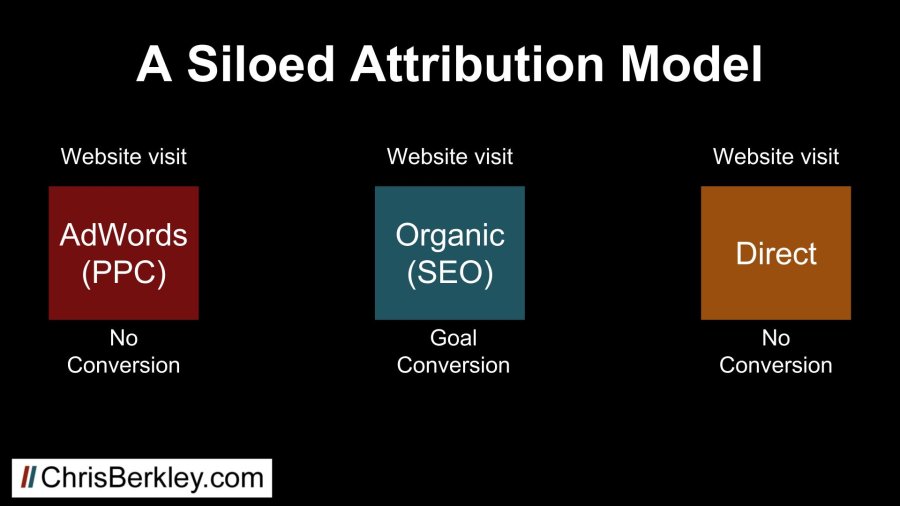
Without looking at the full conversion path, this is going to look great for SEO and not so great for PPC efforts. An SEO-specific report is likely to ignore both the paid search and direct sessions that contributed to the conversion. A report specific to paid search may look at the ad spend as ineffective, since it didn’t convert in that session.

I realize including multiple channels may have you thoroughly confused, so let’s simplify it further and say all three visits were organic. This way there’s no question that organic should be attributed the conversion. Let’s also assign an arbitrary number of pageviews to each visit, as seen below.

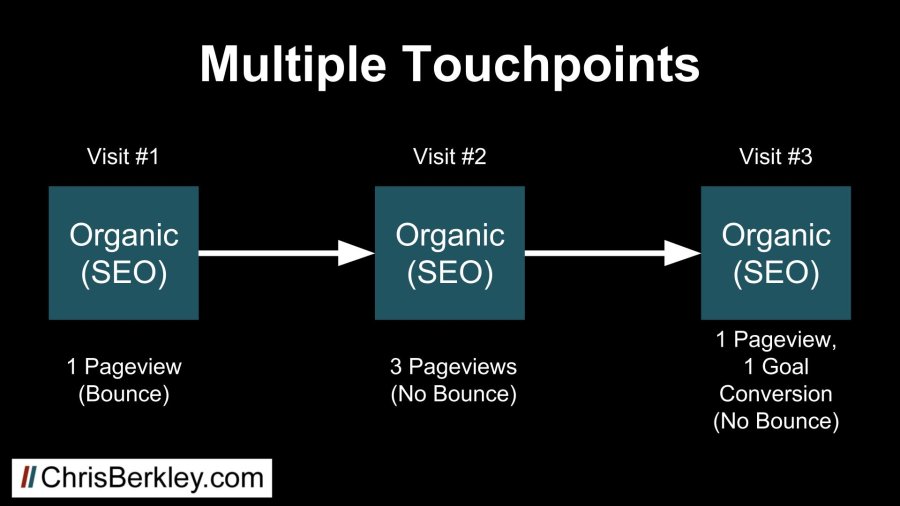
There’s no question about which channel gets the conversion…but it doesn’t change the fact that if analysis is being done at the session-level, these three sessions will not be linked together.

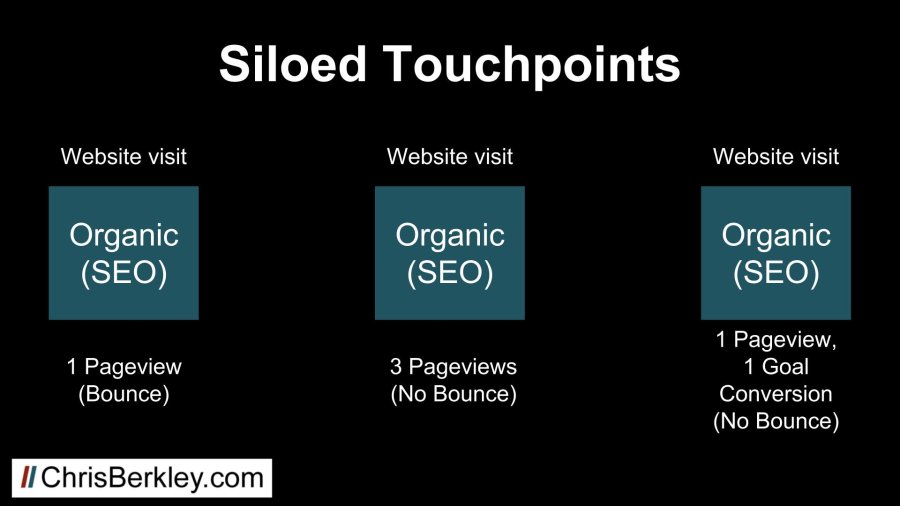
The first visit will be considered a problem because it was a bounce, while the last visit will be celebrated because it resulted in the conversion. Realistically, the last visit may not have happened if it wasn’t preceded by the initial bounce. The middle visit is somewhere in between: not as good as a visit that converts, but at least it’s not a bounce.

It’s possible that all three of these visits played a critical role in the customer journey and discrediting any one of them could result in lost conversions. Similarly, spending time trying to lower bounce rates may be futile if those bounces play a bigger role in a longer path to conversion.

Takeaways

Bounce rate is incredibly complex and boiling it down to good or bad is very, very difficult. As an SEO consultant, I rarely ever focus on bounce rate because I understand this complexity. Bounce rate is not something I report on, and lowering it is never an objective of my campaigns.

SEO projects should be focused on driving relevant traffic that eventually converts into leads, sales and customers, not driving down bounce rates in order to achieve a perceived industry standard or arbitrary metric.

Questions? Comments? Tweet at me (@BerkleyBikes) or drop a comment here!