Category

Technical SEO

How Does Google Treat Subdomains For SEO?

By SEO, Technical SEO 14 Comments

Time and time again, Google has shown that they treat subdomains very differently from root domains, in some cases treating them as completely different sites. For SEO purposes, it’s generally recommended to use a subfolder instead of a subdomain.

Subdomain vs. Subfolder

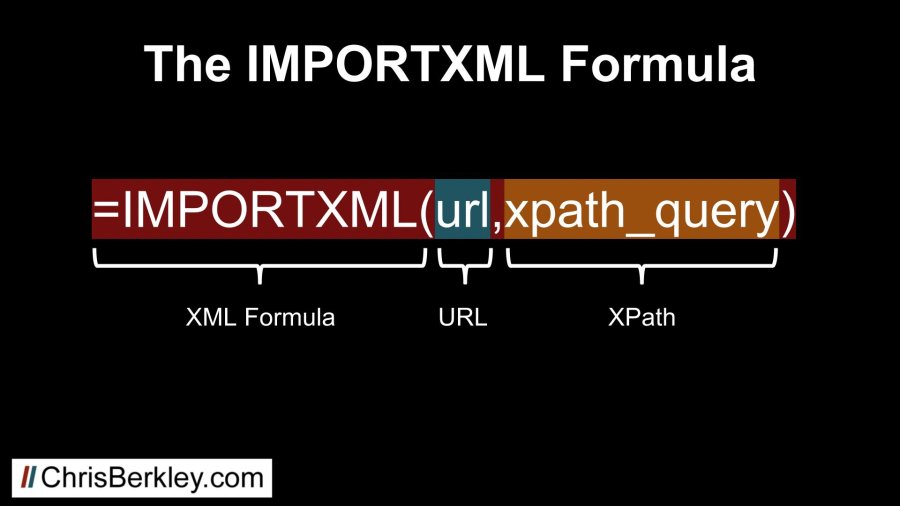
A subdomain is a string of characters that precedes the root domain and uses a period to separate them. A subfolder comes after the domain suffix and is separated by a forward slash. You can have multiple subdomains or subfolders, and you’ll frequently see them combined.

Examples:

  • Blog.chrisberkley.com is a subdomain
  • Chrisberkley.com/posts/ is a subfolder
  • Blog.chrisberkley.com/posts/ is a subdomain with a subfolder.
  • First.blog.chrisberkley.com is two subdomains (“first” and “blog”)
  • First.blog.chrisberkley.com/posts/recent/ is two subdomains (“first” and “blog”) with two subfolders (“posts” and “recent”).

Did You Know?

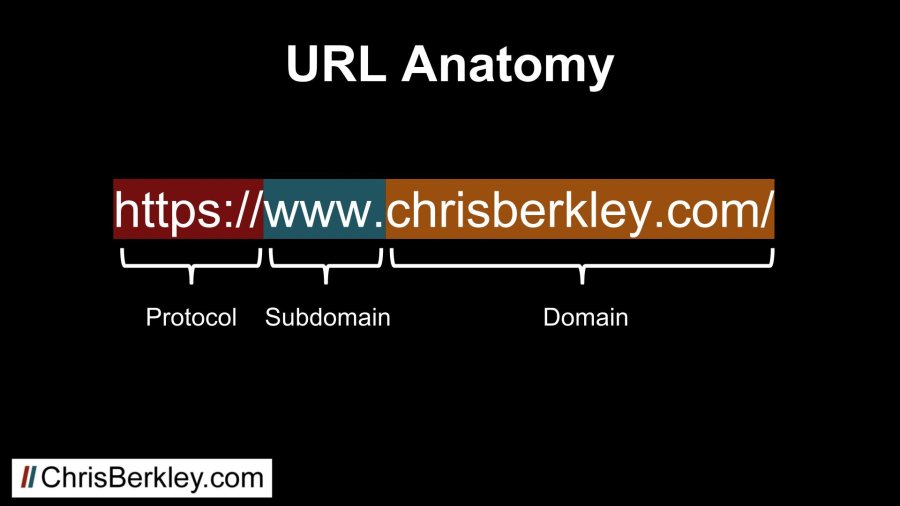
In the URL www.chrisberkley.com, “www” is technically a subdomain. It’s true!

Why Use Subdomains?

There are legitimate reasons that necessitate the use of subdomains and subdomains are not completely unavoidable.

Technical Limitations

Sometimes there are technical infrastructure limitations that prevent the use of a subdomain. In large organizations with big sites, it’s common for access to the root domain to be limited, instead using subdomains for ease of use.

This may include piecing together multiple CMSs. If the core site is hosted on one CMS like Magento or Sitecore, but the blog is hosted on WordPress, it can be difficult (or impossible) to make them work together on the root domain.

Organizational Control

Large organizations often have multiple divisions that operate independently. Such is the case with universities, where individual colleges need to have edit access to their own sites (School of Nursing, School of Engineering, etc.). The same is true for other national organizations like banking institutions.

It’s a lot easier to spool up a separate site on a subdomain and grant a team of people edit access to that particular subdomain. You wouldn’t want the School of Nursing making edits that ended up taking down the entire root domain for the whole college.

International

Sometimes organizations will create international subdomains like fr.chrisberkley.com or en.chrisberkley.com. There’s no inherent SEO benefit to including a country code in the subdomain, but it may comeback to organizational structure or technical limitations. In a perfect world, you’d place those in subfolders (chrisberkley.com/fr/ or chrisberkley.com/en/) and implement hreflang. Alas, we  don’t live in a vacuum and that isn’t always possible.

How Google Treats Subdomains

Working with subdomain-heavy clients, my firsthand experience is that Google treats subdomains as separate sites. A client of mine who had two divisions of their company had one set up on subdomain and another on the root domain. They had some content overlap and we sometimes saw their pages swap places in search results.

It’s my belief that subdomains don’t inherit domain authority or site equity from the root domain. WordPress.com has a domain authority of 94. If subdomains inherited that value, wouldn’t it make sense to setup free blogs on their platform (which uses subdomains) and immediately benefit from the SEO value?

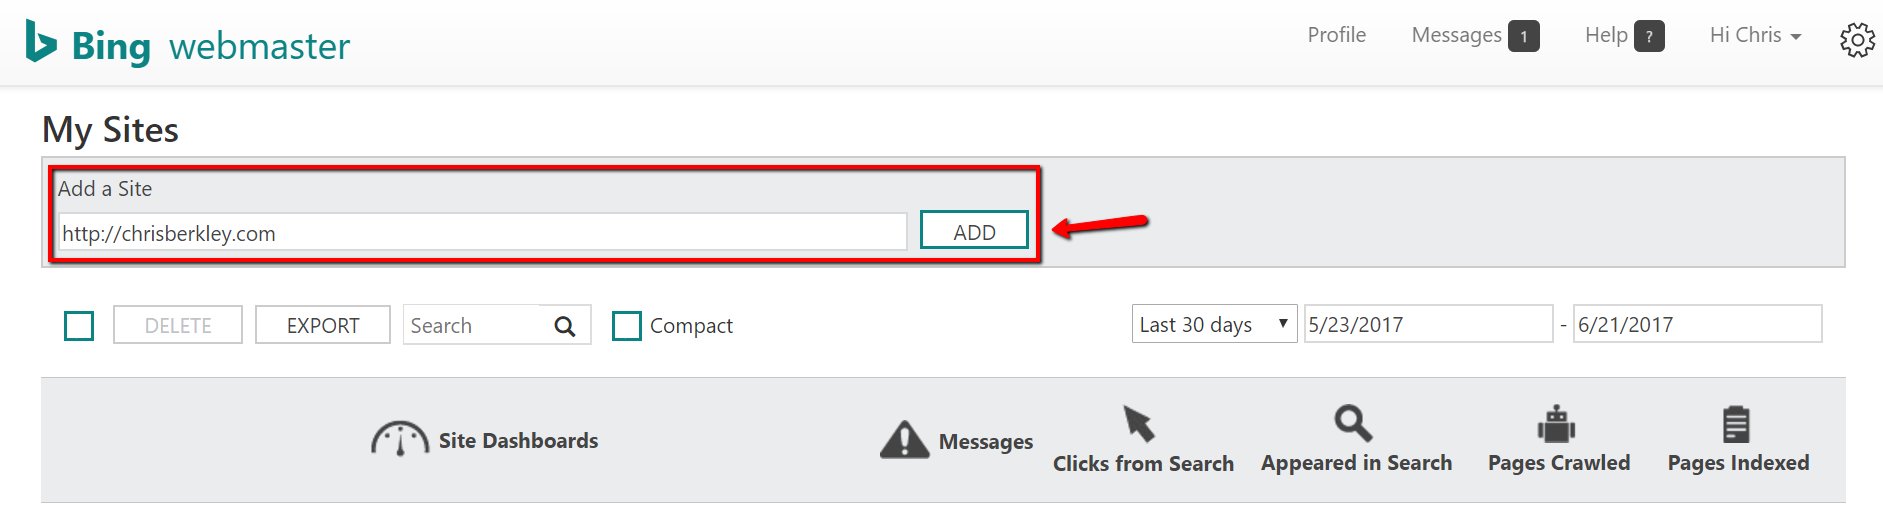
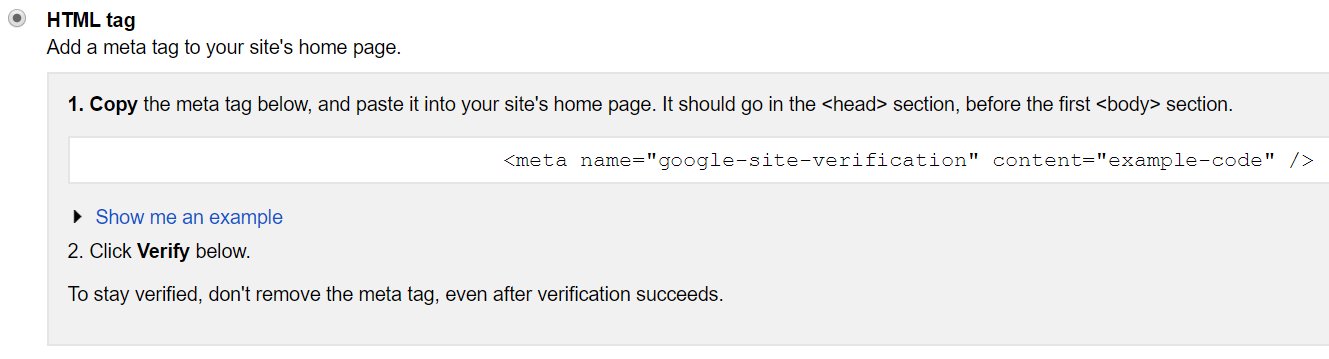
Secondly, Google’s own Search Console requires you to set up separate profiles for subdomains. That’s another good indicator that they value subdomains differently.

That doesn’t mean subdomains inherit ZERO equity from their root domains. They may inherit a greatly reduced amount. OR, Google may adjust the amount of equity they inherit on a case-by-case basis. Since WordPress.com has thousands of low-authority blogs on subdomains, Google may devalue their subdomains more than other sites that only have a handful.

Google has stated that their search engine is indifferent to subdomains vs. subfolders, but the SEO community has repeatedly found that to be false. Industry thought-leader Moz moved their content from a subdomain to a subfolder and saw measurable increases just as a result of that move.

Questions? Comments? Leave them here or reach out to me on Twitter: @BerkleyBikes.

How To Use IMPORTXML & Google Sheets to Scrape Sites

By SEO, Technical SEO 6 Comments

IMPORTXML is a very helpful function that can be used in Google Sheets to effectively crawl and scrape website data in small quantities (especially useful for grabbing titles and meta descriptions, etc.). It can be faster and more convenient that using Screaming Frog or other tools, especially if you only need to pull data for a handful of URLs. This post will show you how to use IMPORTXML with XPath to crawl website data including: metadata, Open Graph markup, Twitter Cards, canonicals and more.

Skip Ahead: Get the free template.

Setting Up The IMPORTXML Formula

This is the IMPORTXML formula:

=IMPORTXML(url,xpath_query)

You can see there are two parts and they’re both quite simple:

The first half of the formula just indicates what URL is going to be crawled. This can be an actual URL – but it’s much easier to reference a cell in the spreadsheet and paste the URL there.

The second half of the formula is going to use XPath to tell the formula what data is going to be scraped. XPath is essentially a language that is used to identify specific parts of a document (like a webpage). Subsequent paragraphs will provide different XPath formulas for different pieces of information you might want to scrape.

Crawling Metadata with IMPORTXML

The following XPath formulas will scrape some of the most commonly desired SEO data like metadata, canonical tags, and H headings. Note that you can scrape any level of H heading by replacing the “h1” with whichever heading you want to scrape (h2, h3, etc.)

Title Tags: //title/text()
Meta Descriptions: //meta[@name='description']/@content
Canonical Tags: //link[@rel='canonical']/@href
H1 Heading(s): //h1/text()
H2 Heading(s): //h2/text()

Social Markup

While social markup has no immediate SEO benefit, it is very important for sites that have active audiences on social media, and implementation of social markup often falls under the umbrella of SEO because of its technical nature. The following XPath formulas will allow you to scrape Open Graph and Twitter Card markup.

Open Graph Markup

Open Graph is used by Facebook, LinkedIn and Pinterest, so all the more reason to make sure it’s implemented correctly.

OG Title: //meta[@property='og:title']/@content
OG Description: //meta[@property='og:description']/@content
OG Type: //meta[@property='og:type']/@content
OG URL: //meta[@property='og:url']/@content
OG Image: //meta[@property='og:image']/@content
OG Site Name: //meta[@property='og:site_name']/@content
OG Locale: //meta[@property='og:locale']/@content

Twitter Card Data

Twitter Card markup is only for….Twitter. Still important though!

Twitter Title: //meta[@name='twitter:title']/@content
Twitter Description: //meta[@name='twitter:description']/@content
Twitter Image: //meta[@name='twitter:image']/@content
Twitter Card Type: //meta[@name='twitter:card']/@content
Twitter Site: //meta[@name='twitter:site']/@content
Twitter Creator: //meta[@name='twitter:creator']/@content

Limitations

Unfortunately, IMPORTXML & Sheets cannot be used to scrape large quantities of data at scale, or it will stop functioning. For more than a handful of URLs, it’s recommended to use a more robust program like Screaming Frog (Screaming Frog does not have a URL limit when using it in list mode).

IMPORTXML Google Sheets Template

You can see how this works firsthand by making a copy of this Sheets Scraper Template and entering the URL of your choice in cell B6. To add additional URLs, copy & paste row 6, then enter a different URL.

Questions? Contact me here or reach out on Twitter!

WWW vs. non-WWW For SEO

By SEO, Technical SEO No Comments

There is no SEO benefit to WWW URLs vs non-WWW URLs. Best practice is to pick one as the preferred version and use server-side redirects to ensure all visitors (human and search engine) end up on one single preferred version of the URL.

What Is WWW?

First let’s start with URL structure:

In the URL above, there are three parts:

  • Protocol
  • Subdomain
  • Domain name

Protocol is a topic for another time, but WWW is technically a subdomain. Websites often use multiple subdomains for different purposes: one for email, one for intranet access, etc. The www subdomain has traditionally been used as the designated subdomain for public-facing websites.

Which Is Better For SEO?

As noted, there is no benefit for SEO purposes. You don’t actually need a subdomain. It’s perfectly fine not to use it and there is zero functional difference for SEO purposes. However, you DO need to pick one version and use it consistently.

Server-Side Redirects

Once a preferred version has been chosen, the other version needs to be 301-redirected at the server level. If it isn’t, it might result in:

  1. Non-preferred URLs returning 404 errors.
  2. The website rendering pages in both variations.

Configuring the server to redirect non-preferred versions to preferred versions ensures that ALL URLs will be redirected automatically.

Configuring Google Search Console

Additionally, it’s recommended to configure Search Console to indicate the preferred version as well. In the top right corner, click the gear icon and select Site Settings. There you’ll see the option to set a preferred version of the URL:

What Are XML Sitemaps? How To Use Them for SEO

By SEO, Technical SEO

XML Sitemaps are critical to help search engines crawl websites, but I frequently see clients with critical errors in their XML sitemaps. That’s a problem because search engines may ignore sitemaps if they repeatedly encounter URL errors when crawling them.

What Is An XML Sitemap?

An XML Sitemap is an XML file that contains a structured list of URLs that helps search engines crawl websites. It’s designed explicitly for search engines – not humans – and acts as a supplement. Whereas web crawlers like Googlebot will crawl sites and follow links to find pages, the XML sitemap can act as a safety net to help Googlebot find pages that aren’t easily accessed by crawling a site (typically called island pages, if there are no links built to them).

Where Do XML Sitemaps Live?

The XML sitemap lives in the root folder, immediately after the domain, and often follows a naming convention such as domain.com/sitemap.xml. A Sitemap declaration should also be placed in the robots.txt file so that Google can easily discover it when it crawls the robots.txt file.

What URLs Should Be Included In An XML Sitemap?

URLs included in the XML sitemap should be URLs that are intended to be crawled, indexed and ranked in search results. URLs should meet the following specific criteria in order to be included:

  • Only 200 OK URLs: no 404s, 301s, etc.
  • Pages do not contain a noindex tag
  • Pages are not canonicalized elsewhere
  • Pages are not blocked by robots.txt

HTTP Status Codes

Sitemap URLs should return clean 200 status codes. That means no 301 or 302 redirects, 404 errors, 410 errors or otherwise. Google won’t index pages that return 404 errors, and if Googlebot does encounter a 301 redirect, it will typically follow it and find the destination URL, then index that.

If you have 404 errors, first ask why: was a page’s URL changed? If so, consider redirecting that URL by locating the new URL. Take that new URL and make sure that is included in the sitemap.

If there are 301s or 302s, follow them to the destination URL (which should be a 200) and replace the redirected URL in the sitemap.

Noindexed & Disallowed Pages

If a page has a noindex tag, then it’s clearly not intended to be indexed, so it’s a moot point to include it in the XML sitemap. Similarly, if a page is blocked from being crawled with robots.txt, those URLs should not be included either.

If you DO have noindexed or disallowed pages in your XML sitemap, re-evaluate whether they should be blocked. It may be that you have a rogue robots.txt rule or noindex tags that should be removed.]

Non-Canonical URLs

If a page in the sitemap has a canonical tag that points to another page, then remove that URL and replace it with the canonicalized one.

Does Every Clean 200 Status URL Need To Be Included?

In short, no. Especially on very large sites, it may make sense to prioritize the most important pages and include those in the XML Sitemap. Lower priority, less important pages may be omitted. Just because a page is not included in the XML sitemap does not mean it won’t get crawled and indexed.

Sitemap Limits & Index Files

An XML sitemap can only contain 50,000 URLs or reach a file size of 10MB. Sitemaps that exceed this limit may get partially crawled or ignored completely. If a site has more than 50,000 URLs, you’ll need to create multiple sitemaps.

These additional sitemaps may be located using a sitemap index file. It’s basically a sitemap that has other sitemaps linked inside it. Instead of including multiple sitemaps in the robots.txt file, only the index file needs to be included.

If there ARE too many URLs to fit into one sitemap, URLs should be carefully and methodically structured in hierarchical sitemaps. In other words, group site sections or subfolders in the same sitemap so that Google can get a better understanding of how URLs interrelate. Is this required? No, but it makes sense to be strategic.

Types of XML Sitemaps

In addition to creating sitemaps for pages, sitemaps can (and should) be created for other media types including images, videos, etc.

Dynamic vs. Static

Depending on the CMS and how it’s configured, the sitemap may be dynamic, meaning it will automatically update to include new URLs. If it’s configured correctly, it will exclude all the aforementioned URLs that shouldn’t be included. Unfortunately, dynamic sitemaps do not always operate that way.

The alternative is a static sitemap, which can easily be created using the Screaming Frog SEO spider. Static sitemaps offer greater control over what URLs are included, but do not automatically update to include new URLs. In some cases I’ve recommended clients utilize static sitemaps if a dynamic sitemap cannot be configured to meet sitemap criteria. When that happens, I set a reminder to provide an updated sitemap, typically on a quarterly basis, or more often if new pages are frequently added to the site.

Submission to Webmaster Tools

Once an XML sitemap has been created and uploaded, it should always be submitted to Google Search Console and Bing Webmaster Tools to ensure crawlers can access it (in addition to the robots.txt declaration).

In Google Search Console

Navigate to Crawl > Sitemaps and at the top right you’ll see an option to Add/Test Sitemap. Click that and you can submit your sitemap’s URL to be crawled.

In Bing Webmaster Tools

From the main dashboard, navigate down to the sitemaps section and click “Submit a Sitemap” at the bottom right. There you can enter your sitemap’s URL.

Finding Pages With Embedded Wistia Videos

By Technical SEO, Video No Comments

Wistia is a great platform for hosting videos on your site with tons of functionality including the ability to embed videos on pages and optimize them using built-in calls-to-action and pop-ups.

Recently I encountered a scenario where I wanted to find every website page that had a Wistia video on it. Going into Wistia’s back end revealed that the client had ~200 videos, but I had no idea where they were actually placed on the site, and wanted to ensure they were being used to full capacity.

With YouTube, you can simply run a Screaming Frog crawl and do a custom extraction to pull out all the embed URLs. From there you can determine which video is embedded based on that URL. However, the way Wistia embeds videos is not conducive to identifying which video is where, based on an embed URL. I couldn’t find any distinguishing characteristics that would help me identify which video was which.

How can such an advanced video platform be so incredibly difficult?

That’s mostly because Wistia relies heavily on Javascript. As Mike King notes in his article The Technical SEO Renaissance, right clicking a page and selecting “view page source” won’t work because you’re not looking at a computed Document Object Model. In layman’s terms, you’re looking at the page before it’s processed by the browser and content rendered via Javascript won’t show up.

Using Inspect Element is the only way to really see what Wistia content is on the page. Doing that will show you much more information, including the fact that Wistia automatically adds and embeds video Schema when you embed a video. This is awesome and saves a ton of work over manually adding Schema like you have to do with YouTube videos.

The video Schema contains critical fields like the video’s name and description. These are unique identifying factors that we can use to determine which video is placed where, but how can it be done at scale when we don’t even know which pages have videos and which don’t?

Finding Wistia Schema With Screaming Frog

Screaming Frog is one answer. Screaming Frog doesn’t crawl Javascript by default, but as of July 2016, DOES have the capability to do so if you configure it (you’ll need the paid version of the tool).

Go into Configuration > Spider > Rendering and select Javascript instead of Old AJAX Crawling Scheme. You can also uncheck the box that says Enable Rendered Page Screenshots, as this will create a TON of image files and take unnecessarily long to complete.

Setting Up a Custom Extraction

Next you will need to setup a Custom Extraction which can be done by going to Configuration > Custom > Extraction. I’ve named mine Wistia Schema (not required) and set the extraction type to regex, then added the following regular expression:

<script type="application\/ld\+json">\{"@context":"http:\/\/schema.org\/","\@id":"https:\/\/fast.wistia.net\/embed.*"\}<\/script>

This will ensure you grab the entire block of Schema, which can be manipulated in Excel later to separate different fields into individual columns, etc.

Then set Screaming Frog to list mode (Mode > List) and test the crawl with a page that you know has a Wistia video on it. By going into the Custom Extraction report, you should see your Schema appear in the Extraction column. If not, go back and make sure you’ve configured Screaming Frog correctly.

Screaming Frog Memory and Crawl Limits

The only flaw in this plan is that Screaming Frog needs a TON of memory to crawl pages with Javascript. Close any additional programs that you don’t need open so that you can reduce the overall memory your computer uses and dedicate more of it to Screaming Frog. With large sites, you may run out of memory and Screaming Frog may crash.

Takeaways

  • Wistia uses Javascript liberally.
  • Schema is embedded automatically, using Javascript.
  • Schema can be crawled and extracted with Screaming Frog, but it’s a memory hog so larger sites might be a no-go.

Questions? Tweet at me: @BerkleyBikes or comment here!

How To Setup & Verify Bing Webmaster Tools

By SEO, Technical SEO

If you’ve read my instructions on how to verify Google Search Console, you may be wondering how to do the same for Bing Webmaster Tools. Or maybe you aren’t, because you never really thought much about Bing Webmaster Tools, in which case: read on.

While you may not pay much attention to Bing as a search engine, you’re doing yourself a disservice if you don’t set up and verify Bing Webmaster Tools. Just last year, Bing Webmaster Tools helped me troubleshoot an indexation issue with an enterprise-level education client – an issue that could have cost them thousands of lost site visits had we not used Webmaster Tools to identify it so quickly.

Bing Webmaster Tools offers almost all the same functionality as Google Search Console and while you may not use it nearly as much (or at all) it should be included in your standard setup process.

Creating a Webmaster Tools Account


First you’ll need to create a Webmaster Tools account, assuming you don’t have one already. Go to https://www.bing.com/toolbox/webmaster and click “Sign Up”

You’ll be prompted to fill in the necessary info, before clicking “Create Account”

Once you’ve created an account, you’ll see a screen that looks like this. Add the URL of your site and click “Add.”

Adding an XML Sitemap

Next Bing will ask you to add a sitemap. You should do this, so find your XML sitemap and paste that URL into the Sitemap box.

Verifying the Profile

There are three ways to verify the profile:

XML File

Download the Bing XML file and upload it to the domain’s root folder, effectively creating the URL YOURSITE.com/BingSiteAuth.xml. You’ll need to do this via FTP, so if you don’t have server access, this will be difficult or even impossible.

Meta Tag

The second option involves adding a meta tag to the homepage of your site. This is a simple line of HTML not unlike a meta description. If you’re using a CMS that offers a section for custom HTML, you can enter it there in order to push it live on the page.

Note: This meta tag needs to be left in place in order to Webmaster Tools to continue to be verified.

Hosting Provider: CNAME

The third listed option allows you to log into your hosting provider and add a CNAME record. This is likely the most sure-fire, permanent way to verify the profile but may also be the most difficult. If you can’t log into your hosting provider, this option is not helpful.

Bing Webmaster Tools Verification on WordPress

Bing WMT Verification on WordPress is painfully easy.

You should already have one of two SEO plugins installed: Either A) Yoast’s WordPress SEO plugin or B) All In One SEO Pack. Both are really freaking good plugins and you’re doing yourself a disservice if you don’t have one of them installed on your WordPress site.

Verifying Bing Webmaster Tools with Yoast’s WordPress SEO Plugin

In the WordPress backend, go to SEO > Dashboard > Webmaster Tools. Yes there is also a Search Console menu item. No, that’s not where you actually verify Google Search Console OR Webmaster Tools.

Here you’ll see three different form fields. Go back and look at the HTML meta tag I mentioned earlier in this post, copy the value and enter it here. Once you’ve done that, click ‘Save Changes’ then go back into Webmaster Tools and click verify (using the HTML tag method).

Verifying Search Console with All In One SEO Pack

For those using All in One SEO Pack, the process is not much different. Go to All In One SEO > General Settings and scroll all the way down to the ‘Webmaster Verification’ section, where you will see the same two fields for Google and Bing Webmaster Tools.

Once you’ve done this, KEEP SCROLLING DOWN. With so many features on one page, it’s easy to miss the ‘Update Options’ button, which is critical to make sure your settings get saved.

Verification Completion

Once you’ve completed one of these three methods, go back into Webmaster Tools and make sure you click the ‘Verify’ button. Then you’ll have access to all of the Webmaster data that Bing provides!

How To Verify Google Search Console (Webmaster Tools)

By Analytics, SEO, Technical SEO 2 Comments


Creating a Google Search Console profile is actually quite easy, with the possible exception of the pesky verification part. Nevertheless, it’s not that difficult, and I’ll show you how to do in record time. There are 5 ways to verify a Search Console profile. Your site configuration, tracking setup, user permissions, etc. will determine which one is best for you. I’ll explain them all here, starting with my preferred methods. If you’re doing this on WordPress, skip to the bottom of the post, I’ve got specific instructions just for you.

Google Analytics

Google Analytics is a fairly easy option, assuming three things:

  1. You’re using asynchronous (analytics.js) tracking code.
  2. Tracking code is placed in the <head> section.
  3. You have ‘edit’ user permissions.

If any of these three things raises a red flag, the GA verification option is not for you. If you pass the criteria, click the red Verify button and you’re off to the races. If you’re using Google Tag Manager, this method is a no-go, but you can use the GTM method in the paragraph after this.

Google Tag Manager

If you’re using Google Tag Manager, you can’t use the GA method, but there’s an option specifically for you. Needless to say, there are criteria for this also:

  1. You have to be using the container snippet.
  2. You must have ‘manage’ user permissions for that container.

If you don’t fit those criteria, keep moving. If you do, click ‘Verify’ and you’re done.

HTML Tag

The HTML tag is simply a meta tag (a single line of HTML code) that gets added to the homepage and voila, verifies the site/profile. Depending on the CMS, this may be very easy to do (in WordPress it’s a pinch). You can either do this yourself if you have CMS access, or ask a web developer or marketing manager to implement it. How you do this depends on what CMS you’re using. It’s likely you have a custom HTML field or something similar where the tag can be added. The tag needs to go in the <head> section of the homepage.

Once you’ve verified it has been added, go back into Search Console and click the big red ‘Verify’ button. Even after you’ve succeeded, leave the HTML tag on the home page, or the property will revert back to unverified status.

HTML File Upload

The HTML file upload is similar to the HTML tag, but instead of a line of code, you’re adding a small HTML file to the root domain. To do this, you’ll effectively need the ability to add files to the root folder on the hosting provider. FTP access is ideal, but if you’re a marketer, you probably don’t have that. If possible, ask the web developer to add it. Once you’ve done this, visit the URL created by the file to ensure it’s in the root folder and not a subfolder.

Domain Name Provider

This method is listed as Google’s recommended method – possibly because it’s the most secure? In any case, Google will prompt you to log into the provider where you bought your domain name (for example, GoDaddy or NameCheap).

If you have access to the domain name provider – that’s fine. However (and speaking from experience) it’s much more likely that you don’t have access to this, which makes it a moot point. I’ve only used this method to verify a Search Console profile once, and it was on my own site. On the hundreds of other GSC profiles I’ve created over the years, I’ve never had access to the domain name provider. With clients, getting access to that may involve going through a compliance department or IT team, which, as you can imagine, takes far more time than it’s worth. There are simply easier ways!

Search Console/Webmaster Tools Verification on WordPress

If you’re trying to verify Google Search Console or Bing Webmaster Tools on WordPress, you’re in luck, because it’s ridiculously easy. I’ll assume you already have one of two SEO plugins installed. Either A) Yoast’s WordPress SEO plugin or B) All In One SEO Pack. Both are really freaking good plugins and you’re doing yourself a disservice if you don’t have one of them installed on your WordPress site.

Verifying Search Console with Yoast’s WordPress SEO Plugin

In the WordPress backend, go to SEO > Dashboard > Webmaster Tools. Yes there is also a Search Console menu item. No, that’s not where you actually verify Search Console.

Here you’ll see three different form fields Go back and look at the HTML tag I mentioned earlier in this post, copy the value and enter it here. You can also enter your Bing Webmaster Tools Verification (you have that too, right?)

Once you’ve done that, click ‘Save Changes’ then go back into Search Console and click verify (using the HTML tag method).

Verifying Search Console with All In One SEO Pack

For those using All in One SEO Pack, the process is not much different. Go to All In One SEO > General Settings and scroll all the way down to the ‘Webmaster Verification’ section, where you will see the same two fields for Google and Bing Webmaster Tools.


Once you’ve done this, KEEP SCROLLING DOWN. With so many features on one page, it’s easy to miss the ‘Update Options’ button, which is critical to make sure your settings get saved.

That’s essentially it. With 5 different options to verify GSC, you’re sure to find at least one option that works for you, and verifying by more than one option is always a nice failsafe if you have the option available to you. Questions? Comment here or hit me up on Twitter (@BerkleyBikes)

Additionally, don’t forget to setup Bing Webmaster Tools so that you can get the same insights from Bing.

Course & ItemList Education Schema

By SEO, Technical SEO 5 Comments

In December, Google announced they’re supporting Course Schema by providing rich snippets in search results. Where can this Schema be applied? Educational content that is “A series or unit of curriculum that contains lectures, lessons, or modules in a particular subject and/or topic.”

The Education Schema doesn’t appear to have any tangible benefit for desktop results, but here’s a screenshot of what it looks like on mobile:

What it means: Educational sites can increase their presence in mobile organic results by four fold. Not only does the ranking page appear, but there are up to three additional links featured underneath. This is an incredible land grab, one that nearly dominates the entire screen on a mobile device.

There must be some criteria to determine what sites qualify for this Schema, but it’s not exactly clear. If it worked on any site, folks would already be abusing this. It doesn’t appear to be keyword-specific, and more likely relies on Google’s interpretation of what constitutes an education-related site.

How Does Educational Course Schema Work?

There are two parts: ItemList Schema and the Course Schema itself. The ItemList Schema works in tandem with the Course Schema to present the rich snippet seen above.

ItemList Schema

ItemList Schema is placed on a program or category page that features individual classes, courses or degrees. It’s literally just Schema that indicates a list of links present on the page. There are three fields:

  1. itemListElement
  2. ListItem.position
  3. ListItem.url

Here’s what the code looks like:

<script type="application/ld+json" >{
	"@context":"http://schema.org",
	"@type":"ItemList",
		"itemListElement":[
		{"@type":"ListItem",
			"position":1,
			"url":"URL-1"},
		{"@type":"ListItem",
			"position":2,
			"url":"URL-2"},
		{"@type":"ListItem",
			"position":3,
			"url":"URL-3"}]
	}
</script>

Course Schema

The actual Course Schema isn’t complex either. Course Schema is placed on each of the individual pages featured on the program or category page.

It has three fields:

  1. Name
  2. Description (limited to 60 characters)
  3. Provider

Here’s what the code looks like:

<script type="application/ld+json">
{
  "@context": "http://schema.org",
  "@type": "Course",
  "name": "COURSE NAME",
  "description": "COURSE DESCRIPTION",
  "provider": {
	"@type": "Organization",
	"name": "NAME",
	"sameAs": "URL"
  }
}
</script>

Notably, Course Schema itself is pretty bland and not specific to education at all. However, this Schema is currently listed as pending on Schema.org, and there are a large number of additional fields (none of which appear to provide tangible benefit other than helping Google crawl the page).

What’s The Benefit of Course Schema?

First, taking up extra space in search results knocks competitors lower. Secondly, it provides sites with the ability to rank other pages for specific keywords where they normally wouldn’t rank.

For example, if you have a category page that ranks for Healthcare Degrees, you can now add a link to specific degree programs like Master of Public Health or Master of Health Informatics. These are pages that are likely lower in the conversion funnel and would never normally rank for a higher funnel keyword.

Effort vs. Impact

There’s very little effort involved here. Writing the Schema itself takes less than 30 minutes and if you have the ability to insert a block of JSON code on the four pages in question, implementing shouldn’t take any longer either.

Any real investment in time should go towards strategizing what pages to include in the Schema. Pages that are higher priority or higher traffic are likely to be better candidates.

The impact is clear and almost immediate – I recommend submitting these pages to Search Console for crawling and indexing once the Schema is live. This is a rare scenario where SEO provides instant gratification.

Reporting & Measurement

Once the Schema is live, you can use a combination of traffic in Google Analytics and impression/click data from Google Search Console to gauge the full impact. Search Console will also give you the keyword data, so that’s likely to be more valuable for tracking clicks from keywords where the page would not normally rank.

If you have any questions, comment here or tweet at me: @BerkleyBikes.