Category

Uncategorized

Virtual Event Schema Sample

By Uncategorized No Comments

This is a sample of Event Schema for Virtual Events. The goal is to craft Schema that *may* associate the Virtual Event with an Organization’s Google My Business listing.

<script type="application/ld+json">
{"@context" : "http://schema.org",
"@type" : "Event",
"name" : "Indy Hall Event Number One",
"description" : "This is the first Indy Hall virtual event.",
"url" : "https://www.indyhall.org/events/number-one/",
"image" : "https://www.indyhall.org/media/events/number-one.jpg",
"startDate": "2020-04-23T14:00-4:00",
"endDate": "2020-04-23T15:00-4:00",
"eventAttendanceMode": "https://schema.org/OnlineEventAttendanceMode",
"eventStatus": "https://schema.org/EventScheduled",
"performer" : "Alex Hillman",
"offers": {
    "@type": "Offer",
    "price": "0.00",
    "priceCurrency": "USD",
	"availability" : "InStock",
	"url" : "https://www.indyhall.org/tickets/",
	"validFrom" : "2020-04-23T12:00-5:00"},
"organizer" :
{"@type" : "Organization",
"name" : "Indy Hall",
"url" : "https://www.indyhall.org/",
"address": 
{"@type" : "PostalAddress",
"streetAddress" : "399 Market Street Suite 360",
"addressLocality" : "Philadelphia",
"addressRegion" : "PA",
"postalCode" : "19106"}},
"location" : 
{"@type" : "VirtualLocation",
"url" : "https://www.indyhall.org/zoom/"},
"sameAs" : ["https://meetingplace.io/indyhall/events/0001"]}
</script>


SEO Crawlability vs. Indexation vs. Ranking

By Uncategorized No Comments

Crawlability, indexation and ranking are often confused, and while they relate very closely, they mean very different things. Before ranking can happen, crawling and indexing has to occur, and that’s why technical SEO is so important.

Crawlability

Crawlability is at the core of SEO. When a search engine crawler like Googlebot or Bingbot accesses a website, they crawl it to find all the pages, images, links, CSS and Javascript files, etc. By definition, crawlability is the ability of search engines to find and access website content.

If a search engine can’t access website content, then neither indexation nor ranking are possible. Those things rely on search engines being able to crawl the content in the first place.

Changing Crawlability with Robots.txt

Robots.txt is the most common method to prevent search engines from crawling a website. If a specific URL or subfolder is blocked in robots.txt, search engines will not crawl it. That means links on that page won’t be discovered, and entire site sections might not be discovered (that’s why it’s important to have an XML and/or HTML sitemap – redundancy!)

In this example, robots.txt is being used to block search engines from crawling pages that fall in the /properties/listing/ subfolder on a real estate website.

User-agent: *
Disallow: /properties/listing/

Blocking Crawlability

Sometimes content is prevented from being crawled inadvertently. If content is rendered with Javascript, this can sometimes be problematic, although changes to Googlebot will now allow it to better crawl Javascript than ever before.

Additionally, if links are using a nofollow directive, that may present issues as the nofollow attribute instructs Googlebot NOT to follow links. However, there’s debate about how Google really handles nofollow links, with some claiming that Google does crawl them, but doesn’t give them any link equity.

Indexation

Once content has been crawled, it’s up to search engines to decide whether to index that content. If the content is duplicated or plagiarized, then search engines may choose to crawl it, but not index it. Similarly, thin or low quality pages may fall victim to the same fate.

Preventing Indexation

You may choose to intentionally prevent search engines from indexing content using a noindex directive. However, search engines still need to crawl that page in order to see the noindex tag. If you want to noindex a page, you have to let it be crawled first. Sometimes a noindexed page will be stuck in the index because it’s blocked by robots.txt and therefore Google cannot see the noindex directive after it’s been added.

Common types of pages that might be noindexed include tag & category pages (common on WordPress). These pages are valuable in that they automate creation of internal links, but they aren’t great for search since they have primarily dynamic content and aren’t optimized well for organic search. I typically recommend noindexing tag & category pages.

Ranking

Ranking is the last step in the process. A page can get crawled and indexed, but not rank well at all. In a competitive space like retail and eCommerce, there are hundreds of websites trying to rank for the same keywords and only 10 will end up with page one visibility.

Improving rankings relies very heavily on A) the on-page content and B) overall site authority and off-site (linking) efforts. Ranking is usually the most difficult part – assuming there aren’t glaring technical issues on the site, crawling and indexation are a lot easier.

Summary

To summarize: rankings rely on crawling and indexation, in that order: Crawling > Indexing > Ranking.

Want more SEO and Analytics content?

Subscribe to my email list

Brazing water bottle bosses

Welding and Completion: The Beast Lives

By Uncategorized No Comments

Over a year ago I built a custom mountain bike frame from metal tubes to design to completion, but never finished writing about it. This is part three, when we finally welded it together. 

Part 1: Welding the Front Triangle, and Rear Assemblies

Labor Day weekend Paul and I drove to Binghamton for the first of two welding sessions. The colossal amount of work, combined with my jig design necessitated two visits, the first of which would finish the front triangle and weld the chainstays and seatstays as separate assemblies.

Before any welding occurred, Paul brazed on the four water bottle bosses as well as my custom cut dropper post outlet. Brazing essentially entails coating the area in flux, heating the tube up until it’s obscenely hot and then touching silver to the joint and letting it flow. It’s impressive to watch.

Paul Dotsenko preparing the torch for brazing

Read More

Front Triangle Jigged Mitered (Bottom Bracket Side)

How To Build A Mountain Bike Frame In Your Parents’ Garage

By Uncategorized 3 Comments

Two weeks ago I outlined my design plans for a 650b steel all mountain hardtail frame. Since then an enormous amount of work has transpired in my quest to build my own frame and then ride it on trails that I built.

Homemade Frame Jig

Jigging is perhaps the main obstacle that separates backyard builders from professional frame builders (aside from knowledge and experience of course). I designed my own frame jig based on a lot of reading and a little design creativity on my end. I aimed for the easiest and most accurate frame jig that worked within my parameters as far as tools and budget.

Read More

RattleCAD Hardtail mockup

Frame Building: Design and Concept

By Uncategorized 2 Comments

There are levels of bike geekdom. Your average rider buys a bike off the shelf and rides it as-is. A more particular rider might swap small parts like grips, saddle, tires, pedals, etc. Some go as far as to swap major components like wheels, cranks, forks, etc.  True bike nerds, however, scoff at the thought of owning a bicycle even remotely close to stock and insist instead on assembling their own bikes with parts of their choosing. Some might even go as far as to strip the bike down and send it out for custom paint or powdercoat. A VERY particular rider may even order a bike with custom geometry.

At the top of the nerdpile (trademark pending) exists a special subset of bike nerds for whom custom geometry and paint is inadequate and doing it yourself is the only option. I am about to enter the 1% of bike geekdom, the pinnacle of bicycle expertise, the top nerd echelon. I am about to build my own frame.

Is this at all necessary? Why would I even consider doing this? In short: 1) No and 2) Because I can. I’m of average proportions and there are dozens of stock bikes that ride well and would fit me perfectly. I don’t purport to be such a talented rider that I require something unique. I’ve simply acquired a level of knowledge that has deluded me into thinking I can build my own bicycle frame. Oh and I know a framebuilder.

Yes that’s correct, I’m lucky enough to be good friends with a very talented frame welder named Paul Dotsenko. Paul formerly worked for FBM Bike Co. welding steel BMX frames and last year I had him make some custom modifications to an existing steel hardtail I own. Stellar work, really. We’ve talked about frame building at length and Paul just moved to a location 40 minutes from me so the timing is right.

That being said, enough talk. What’s the plan?

The plan is to build a long travel steel hardtail based around a 150mm Rockshox Pike, 650b wheels, 44mm head tube, 142×12 dropouts and a 31.6mm seatpost (dropper post compatible). The geometry includes a 67 degree head angle, 73 degree seat angle, and short (425mm chainstays) attached to a 73mm threaded bottom bracket. The seat tube and top tube lengths will imitate similar large-framed mountain bikes at 19″ and 24″, respectively. Most of the materials will be American-made True Temper tubing from Henry James and machined parts from Paragon Machine Works. 

RattleCAD Hardtail mockup

Rough draft of the frame geometry


Next step: Frame jig design and tube selection/placement.


Santa Cruz Bicycles

Stop Pushing Sales and Build Brand Equity

By Uncategorized No Comments

Two articles were published this week that address the issue of rising bicycle costs . The first, by Bicycle Retailer and Industry News (BRAIN) strictly references statistics on rising prices in the cycling industry. The second, by Matt Wragg of Pinkbike, suggests that getting rid of model years could encourage riders to buy more expensive bicycles by prolonging their obsolescence (the bicycles, not the customers). While these articles make some good points, I have some suggestions of my own.

Santa Cruz is a wildly successful cycling brand that illustrates my argument. Here’s why they do so well:

1. They make good bikes that ride well, look nice and last a long time.

2. They only make mountain bikes, which allows for more consistent branding.

3. They keep models, mostly unchanged, for several years.

4. They support discontinued models with readily available replacement parts.

Santa Cruz Bicycles


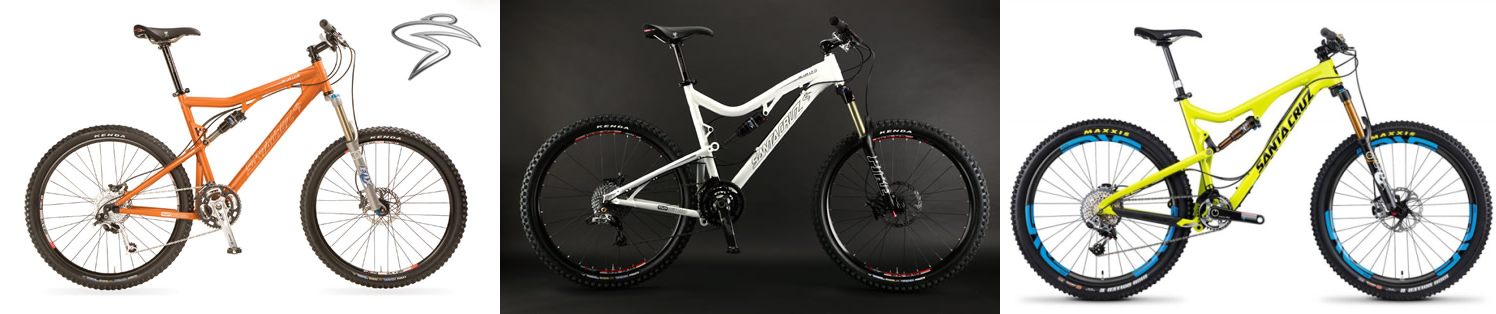
Consequently, they have an excellent brand reputation. Let’s focus on that third bullet point – how long they keep models and how they update them. Despite the fact that it was recently discontinued, the Blur LT illustrates this point well. They introduced the Blur in 2003 and kept it mostly unchanged until a major redesign in 2008. Version 2.0 carried on into 2013 with minor updates like a tapered headtube, ISCG tabs and 142mm dropouts – but the overall platform remained mostly unchanged. That bike was discontinued and replaced by the Bronson, a 150mm, 27.5″ wheeled trail bike which for all intents and purposes is a third generation Blur LT.

The Blur is just one example, but look at other bikes and you’ll see Santa Cruz keeps its models for about four years. Perhaps more importantly, they support those models long after their extinction. Some criticize them for being late to the game when new standards and trends emerge. Indeed, it took some time to add 142mm dropouts to their line up even after their competition had embraced the standard.

What Santa Cruz is doing is building brand equity. When a bike carries on through multiple years unchanged it demonstrates stability and shows potential customers that they stand behind their designs.  It reinforces the image that they make great bikes and reaffirms purchase decisions from current owners. It also gives credibility to their brand and helps customers build an emotional bond with their bikes.

That might sound ridiculous but consider this: riders want to love their bikes. They create precious memories on their bikes and every time they look at them, they’re reminded of those events. That being said, it’s hard to develop any attachment when their bike has been completely redesigned less than a year later. Combine that with an industry tendency to bash previous products in an effort to sell new ones and you leave customers feeling dejected and maybe even remorseful.

The last thing a company wants is for customers to feel remorseful about purchasing their products. The marketing plan often seems to be “look, we’ve made everything so much better that you should run out and buy the new one immediately!” and therein lies the problem that Mr. Wragg mentions – most consumers don’t have the financial means to buy a new $5,000 bike every year. And that’s okay! They don’t have to and we shouldn’t expect them to! Bike companies should focus on building brand equity, so that when those customers DO buy another bike, they buy it from them. Build a culture around products and encourage customers to do the same.

Honda Civics

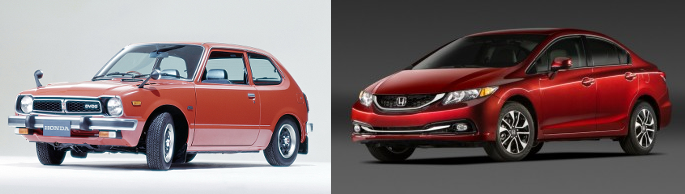
Not convinced? Let’s play off Matt Wragg’s line of thinking and make an analogy to the auto industry, more specifically the Honda Civic. Honda is one of the largest auto manufacturers and the Civic is one of their best selling models, first released in 1972. In 42 years, the Civic has been seen nine different generations. Some quick math reveals an average model life of 4.6 years. Honda prides itself on reliable cars that inspire customer loyalty. This strategy has paid off, as Honda ranks third nationally in customer loyalty.

The statistics referenced by BRAIN are worthy of concern. As bike costs rise and the average household income remains the same, companies need to adjust their thinking if they want to continue to be successful.

Sources

Wragg, M. (2014, February 28). Pinkbike poll: Should mountain bike companies consider ditching model years?. Retrieved from http://www.pinkbike.com/news/pinkbike-poll-should-mountain-bike-companies-consider-ditching-model-years-2014.html

Report available on ‘turbulent’ 2013 us bike market. (2014, February 24). Retrieved from http://www.bicycleretailer.com/studies-reports/2014/02/24/report-available-turbulent-2013-us-bike-market

Porsche, cadillac lead automotive brand loyalty improvements in first quarter, according to polk. (2013, June 5). Retrieved from https://www.polk.com/company/news/porsche_cadillac_lead_automotive_brand_loyalty_improvements_in_first_qtr

Honda civic history. (n.d.). Retrieved from http://www.edmunds.com/honda/civic/history.html

Performing with Pete Seeger, Live in 1999

By Uncategorized No Comments
Pete Seeger Chris Berkley New Paltz Middle School 1999

The original photo, taken in 1999.

Pete Seeger passed away recently and it was an enormous loss for environmental activism. I had the luxury of meeting Mr. Seeger when he hosted a fundraising performance at my elementary school in 1999. My 4th grade class took a field trip on the Sloop Clearwater, followed by a concert at my high school. He performed some of his more famous tunes and was accompanied by my 4th grade class for at least one song. This photo of us after the concert was recently featured in the Poughkeepsie Journal’s tribute article.

Pete Seeger Poughkeepsie Journal Article

The photo as it appeared in the Poughkeepsie Journal

Custom On One Inbred Part 6: Results and Finishing Touches

By Uncategorized One Comment

My semi-custom steel hardtail project (Part 6)

See also parts One, Two, Three, Four and Five.
 

I’ve been riding the Inbred for months now and I enjoy it more and more every time. Phenomenal bike, truly. I made some tweaks – I scrapped the Performance-branded Forte Pisgah tires a couple months ago in favor of some Schwalbe Nobby Nics (2.25s) and set them up tubeless. Both tires were 540g out of the box, compared to 730g each for the Pisgahs. I usually put a lot of sealant in my tires so I didn’t lose much weight there, but that’s not why I do it. The Nobby Nics have incredible grip – they’re like velcro in the turns – and the lost rotational weight has made the bike much more nimble. I also swapped out the seatpost for a longer one (350mm to 400mm) because I was maxed out on minimum insertion and wanted to make sure there wasn’t a chance of cracking the seat tube/top tube junction (prone to happen on frames with long post extension). I went with a zero offset post this time because the seat angle is very slack and I want to be centered over the bottom bracket more.The most exciting addition is a set of custom fork decals for the Revelation. The red/gray graphics on there were fugly and clashed with my black/green theme so I found a guy on Ebay who does custom vinyl stickers and ordered some in apple green. At $9.99 and $2.99 for shipping, they’re a downright bargain. A quality decal, your choice of colors and super fast shipping. His Ebay username is palmermtb and his family’s company name is Stickersbydesign.com – they do all sorts of other custom work too. Custom green vinyl stickers for Rockshox Revelation forkNew green vinyl fork decals

Granny Smith Green On One Inbred with new vinyl fork decals applied

I have 581 miles on this bike now. It’s my go to ride – when I walk out to the garage and pick a steed it’s the first one I swing a leg over almost every time.  Shame to my other bikes really, as they’re quite nice too. There’s a decked out Santa Cruz Blur LT and a carbon Cannondale SuperSix with full Ultegra. Sometimes it’s the simplest bikes that are the most fun. 

Completed Built On One Inbred Granny Smith Green Powdercoat

Custom On One Inbred Part 5: Powdercoating and Assembly

By Uncategorized One Comment

My semi-custom steel hardtail project (Part 5)

 
On to the fifth and final part of my project. I bought the frame. I ordered parts. I had it welded. I assembled it. I test rode it. I disassembled it. Which brings us here, to paint. In the past I’ve owned plenty of bikes that had standard wet paint. I had a frame that was anodized. But I’ve never had one that was powdercoated. For this job it seemed like the best bet. There aren’t many commercial anodizing outfits around. And wet paint isn’t very durable. Powdercoating is a hard durable finish and powdercoaters run abundant.
The Color
The color is called Granny Smith Green. It’s a two stage coating: a base coat followed by a clear. The base coat is what’s called a dormant color – it goes on really dark and looks downright horrible. The clear coat makes everything come alive, brightens it up and brings out the metallic sparkle.
The Powdercoater
Finding a company that is familiar with bikes is key. A couple minutes of extra preparation taping things off is the difference between installing parts and spending hours reaming and facing – especially with such a hard durable finish. Price is secondary – I believe that you save money by doing the job right the first time.

The first place I stopped was K&S Powdercoating in Poughkeepsie, NY. They had the color in stock and Tim quoted me $225 for blasting, prep and powdercoating. They’ve done bikes before and received favorable reviews from some customers who had work done there.The second outfit I spoke to was Precision Powdercoating in Connecticut. I emailed John on a Sunday night and he replied back several minutes later. He also had experience with bikes, had my color in stock and quoted me $160 for blasting and coating. The only downside is that he’s located almost two hours from where I live. 
I also spoke with a third company, but wasn’t impressed with their operation and didn’t even get a quote. Since they were local I went with K&S. Dropped the frame off on a Wednesday and it was done the next day. Super impressive.
The Results
K&S did a great job. The frame was 99% perfect. They taped off EVERYTHING – BB shell, head tube, seat tube, ISCG tabs, even bottle cage braze-ons and derailleur hanger threads. Nevertheless I did the usual prep work anyway.The BB needed facingOn One Inbred ISCG Tabs

On One Inbred non-driveside BB shell

So I chased the threads

Chasing threads on the On One Inbred Bottom Bracket Shell

Then I faced the shell

Facing the On One Inbred's Bottom Bracket

I also faced the head tube. No reaming required here.

On One Inbred Steel Head tube

Facing the On One's head tube

Steel Head Tube After Facing

With the prep work done, the frame was ready to go! But since the paint is so immaculate, here are some more gratuitous frame shots…

Granny Smith Green Steel Head Tube


On One Inbred Bottom Bracket Shell


On One Inbred Powdercoated Seat Stay Yoke


Freshly welded and powdercoated IS disc mount


Powdercoated BB shell area


Assembly…

Shimano XT M760 cranks with MRP bashguard and E.13 32T chainring


Brand new steel bottle cage bolts


SRAM X9 rear derailleur on Inbred dropout


1x9 gearing with Shimano XT brakes


Shimano SLX disc brakes and Rockshox Revelation


RaceFace Atlas 785mm bars with 30mm of rise


Fresh granny smith green powdercoat on the Inbred's top tube


Bottom Bracket and Shimano crankset installed


Total On One Inbred bike weight


Completed Built On One Inbred Granny Smith Green Powdercoat

I added new RaceFace Atlas bars, which even at 785mm wide are still 30g lighter than the Bontrager bar I had on there (690mm, 370g). I also added new SLX rotors, trimmed the brake hoses to fit and added a chainstay protector. Weight is 27.64lbs with XT pedals.I would love to say that the bike is finished, but it’s not. I have a 60mm stem on there, mostly because it’s black. In reality I’ll probably order a black 40mm stem since that’s what I’m used to (I have a white one) and it just feels ‘right.’ I’d like lighter tires to differentiate this from my fully – most likely Nobby Nics in a 2.25, tubeless. And the red decals on the Revelation clash with my green frame – perhaps I’ll get some green ones made up!